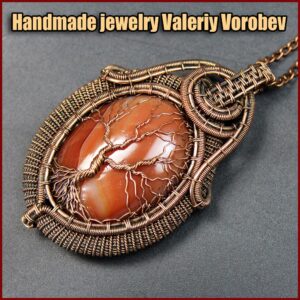
Wire wrap tutorial free. Wire wrapped pendant ideas. Wire wrap cabochon tutorial. Copper wire jewelry. Handmade Wire jewelry Valeriy Vorobev.
Table of Contents
DIY jewelry.
Choosing an outfit, we strive to complement it with stylish accessories. But sometimes it is so difficult to find something that will suit you. But we always want to emphasize our uniqueness.
After all, sometimes a simple knickknack is able to effectively complement your image. Thus, it can give you something necessary to complete your whole look. The jewelry made by hand is considered to be original and truly unique. So, that is where Wire wrap tutorial free may come in handy.
By making it yourself, you will not only implement your desires in the creation but also get a lot of pleasure from the result and process. And you can also save a lot of money. You can buy inexpensive material at the online store. Explore Wire wrap tutorial free and create your own unique decoration.

Many designers, who love to create extravagant and exclusive images, compliment them with extraordinary jewelry. That’s why they prefer jewelry made by hand. Because only with your own hands you can create a unique and inimitable element. Thus you can create the style that you exactly need.
From this Wire wrap tutorial free you will learn how to make a cabochon and copper wire pendant with your own hands. This tutorial will suit both beginners and craftsmen who are already familiar with the technique of making jewelry from wire.
Wire wrap tutorial free. Tools for working with wire.
You don’t need a lot of tools to create a pendant like this one. A small set of hand tools will suffice.

I recommend buying pliers with silicone tips (rubber-tipped pliers) to work with the wire. I have almost always been using this tool for my jewelry in recent years.
Wire wrap tutorial free . Wire to create a pendant.
We will use natural copper wire with a thickness of 1 mm for the base and 0.4 mm for the weaving. You can use any wire of appropriate thickness to create your pendant. The most important is that you follow all of the key steps of my Wire wrap tutorial free.
I usually use natural silver, copper, nickel silver, brass or bronze wire. I like to flatten, melt, twist, patinate and polish the wire to create my jewelry. Only natural wire is suitable for this kind of work.

A stone for a pendant.
I will use an agate cabochon without a hole. I’ve been experimenting a lot lately, looking for new ways to mount stones without a hole. And this little project is no exception. You can say that right now you are participating in the creation of a new design.
My cabochon is 25×18 mm. In my opinion, a 30x20mm cabochon would also work very well for this pendant.
Wire wrap tutorial free.
We need three pieces of 1 mm thick wire about 40 cm long. You should always have a lot of thin wire in stock.

About in the middle, weave three wires together, use whatever technique to weave them. I used one technique of weaving for the entire pendant and it turned out pretty good.

You need to carefully bend the weaving around the cabochon as shown in the photo.

In the process of work, weave the wire and bend the weaving as shown in the photos.


The photo below shows the back of the pendant. Make a loop for a cord or chain.

Sew or weave the weavings together as shown in the photo below. One turn of wire is enough.

Next, we need to make a support for the cabochon. At the bottom of the pendant, attach the two weavings together.

Try on a cabochon from the front side.

And continue to weave and bend weavings creating beautiful patterns.

In order for the cabochon to be securely attached, fasten the two weavings together.

It is important that the weavings securely hold the cabochon at the top of it.

Place three single wires on the back.

Fasten them securely on the back side.

Let’s move on to the bottom part of the pendant. We need to finally attach the cabochon to the jewelry.

Bend the wire and bring it to the back side.


Use a thin wire to fasten the wire on the back side. To keep the ends of the wire from clinging to clothing and scratching the skin, bend the ends nicely.

We can say that the pendant is done.


I like to patinate copper and then polish it. I’m telling about it in almost every Wire wrap tutorial free. I usually patinate copper in ammonia vapor. I just hang the piece in a jar over the ammonia for a while. When the copper darkens, I take the pendant out of the jar and polish it. I use polishing pastes for polishing copper.
To prevent the copper from darkening in the future, sometimes I cover the entire piece with a special colorless varnish.

Add a chain for the pendant.
Let’s summarize. Overall, I am satisfied with the pendant I made. The cabochon is securely attached to the jewelry. As I said before, it makes sense to choose a little bit bigger cabochon for the pendant. Which I will do next time.


