For hundreds of years, professional jewelers have used all sorts of different settings to hold gemstones in place when making jewelry. Recently, however, jewelry made using a technique known as wire wrapping has become quite popular. Rather than using a setting, the gemstones used in wire-wrapped pieces are secured in place using thin wire. One of the great things about this technique is that it’s very simple to learn. It’s also a very affordable option as it only requires a few inexpensive tools and materials.
You’ll Need Jewelry Making Pliers.
1) Flat Nose Pliers
2) Wire Cutters
3) Optional Round Nose Pliers


Choose the right wire
There’s one material budding jewelry designers are most likely to reach for: wire. It’s one of the most versatile materials around, and easy to work with even if you’re new to the art of jewelry making.
Wire comes in a number of different metals: silver, copper, bronze, brass, steel, anodized aluminum. If you’re new to wire however, you might want to start out with copper.

Copper is a popular choice for making jewelry for many reasons. It is a beautiful color and has many possibilities for lovely patinas, is easy to work with, and it is relatively inexpensive to purchase. Most jewelry suppliers should have a wide variety of copper wire sizes, shapes, and tempers to choose from. Copper is slightly softer than sterling silver, but for the most part is still comparable. Copper is often recommended as a great material for beginners who would like to practice working with wire before graduating to the more expensive sterling silver option.
Temper is the hardness or softness of a wire. Each wire is ranked as either dead soft, half hard or hard. Different tempers are best suited for different uses in jewelry making. Half Hard – The most common temper used by jewelry makers, half hard wire works great for a variety of pieces and techniques. It’s commonly used for border wraps or for binding wires together.
Gauge refers to the diameter of the wire, and there are two main gauge systems that you’ll find in craft wire: the American Wire Gauge (AWG), and the gauge/diameter given in mm (metric).
Use appropriate wire thickness.
I make jewelry of wire 1 mm (18 ga) wire for the frames and 0.4 mm (26 ga) thick wire for the weaving.
You can use wire with a thickness of 0.8 mm (20 ga) wire for the frames and 0.3 mm (28 ga) wire for the weaving.

Basic weaves. Wire wrap tutorials.
Discover Basic weaves to use with one, two, three and four… wire frames.
Once you know how to achieve the basic weaves, you can do so much with wire work. It is really simple when you know how.
Tension is important when weaving. Too tight and you will pull your frame wires out of shape, but too loose and your weaving will be uneven.
Constantly tighten and snug your wire wraps as you go because if you wait too long and try to tighten out slack it will be very difficult to work your way back to the loose spot. Be sure to tighten everything up after every 2-3 wraps.
Use nylon tip pliers. Nylon pliers won’t mar your wire so it is less likely to break plus it will also help you to tug and snug your coils without scratching the whole piece.

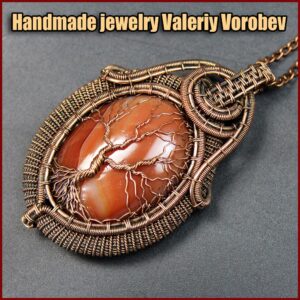
Jewelry making from copper wire. How to make wire wrapped pendant step by step. Wire wrap tutorial.

Use just such a braiding method. In the video below, I applied it to another pendant.
Straighten and cut 4 lengths of 1.0mm wire long enough to wrap around the hole bead you are working with plus plenty of extra to make the bail (our bead is quite large and our wire lengths were approx 50cms long).

Wrap your now-bundled wires around the sides of your crystal tightly. Keep in mind that this step is creating the “bezel” for your stone, so it needs to be done carefully.

Then do as shown in the photo.


I patinate the copper wire, polish it and coat it with a special varnish.
You can hang the pendant from a popcorn chain, chain or leather cord to complete the necklace.
Also, check out Wire wrapping pendant tutorials:


Wire wrapped tutorials PDF Valeriy Vorobev


Like this article? Save it to your blogging board on Pinterest!